Last update:

08/03/2005

  Rear Hubs

About Us Useful Links Forums Mailing List


Up
Care of Alloy Wheels
Front Link Rods
Front Suspension
Front Wishbones
Rear Hubs
Roadwheel Repairs
Steering Rack
Steering Knock
Steering Wander
Vague Steering
New Tyres
Suspension Problems
Steering Manual
Suspension Manual


Scorpio 2.9 12V by Dave Richards

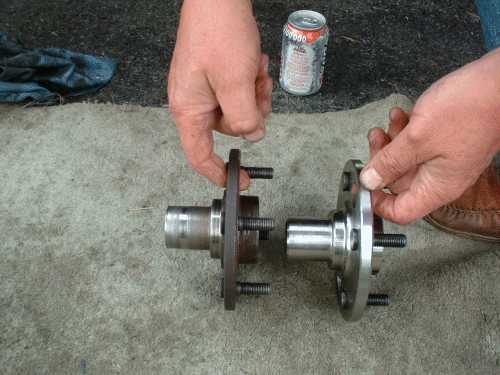
I was suffering from a squeak from the rear nearside of the car which was consistent with wheel rotation. Examination of the brake pads revealed that they were getting quite thin (80000mile) and I had the offer of having them done at cost +£10 so I opted for the easier way and had them done professionally. The rear nearside wheel bearing was not causing concern at this time.

After having the pads replaced the squeak returned with a vengeance a couple of days later and I could see that the disc was rubbing very slightly on its outer edge. I thought that this was due to the fact that the discs were 0.5mm below nominal thickness of 9mm so I carried on and the squeak came and went. 

I eventually heard some rather distressing noises from the rear end so I thought it was time to throw caution to the wind and investigate...getting on in years and the thought of crawling under cars rather put me off but so did Mr Fords cost for his men to do the work (see later). I thought those days were over.

On first jacking up the car I found that the wheel was behaving as though it had a Universal Joint for a bearing . It was not firm and tight like it should have been although the noises I had heard were not consistent with 'bearing failure' as I had experienced when examining vehicles in my previous life... or so I thought. I have since realised that one should NOT 'think', just investigate.


Rear Hub
Component parts of the rear hub assembly


Useful assembly diagram before you start.
Starting off by removing the rear wheel. The car is supported on heavy duty ramps to protect the operator.
The calliper is unbolted and tied out of the way. Ensure that the brake pipe is not stressed, the ABS cable trapped or that the calliper can fall and cause damage.
The rear disk is pulled off after removing the simple clip that is on one of the wheel studs. The disk is normally locked in place by the wheel so the retaining clip is not super-important but save it somewhere safe for re-use.
Undo the centre stub axle retaining nut which is extremely tight (200ft/lb) car left in park for this one (I slackened it off before jacking the vehicle up)

Remove the bolts that hold the hub carrier in place. These are tight and should be loosened a bit each in turn to prevent undue stress on the carrier.

After removing these four bolt it is now possible to pull the bearing cap complete with seals and bearings from the hub which was also replaced due to the damage that had been caused by the bearing breaking up and scoring the hub. The hub (Part No. 87BB F 6156880 £71.63 inc |VAT) was also replaced.
All components are now removed and ready for cleaning and replacements as needed.
Remove the inner and out seals and remove the bearing cages, wipe any surplus grease out of the way and drift out the two bearing caps one from each way with a brass punch taking care not to damage the centre spacer ring which is part of the casting. (I then washed the whole thing in paraffin to degrease)
You can see some of the damage in the wear ridge of the rear hub....
and here it is compared to the new part supplied by Ford.
The bearing kit as supplied
Cleaning up the hub carrier prior to replacement of the bearing and oilseal
Carefully installing the new bearing.

HINT:
It is easier to place the new caps in the freezer for some time to cool them down , they will then drop into the bearing cap a lot easier. I usually use the old cap to hammer them home with.
followed up with the oil seal. Be careful to install centrally and not to damage the delicate rubber edges of the seal.
Reinstalling is simply a case of reversing the dismantling procedure.
Nice shiny new hub place
and the rear disk re-installed and the calliper being bolted back into place. Simply retorque all the bolts correctly and replace the rear wheel and lower the car to the ground.

Job completed!


Points to Note:

I was able to obtain the bearings and seals and retaining nuts as a kit from a local automotive parts dealership (Chester Auto Parts,  www.thequalityfactor.co.uk ) at a  cost of £25.00 +vat. These bearings are exactly the same code as the ones that came out except these aren't broken.

The only problem I encountered was the supplied nuts did NOT fit my axle so a trip the local ford dealership parts counter and I obtained 2of 93bb F 10008849 at a cost of £3.70 each plus of course the obligatory VAT.

You will of course require the brake wind back tool (Can also be done with care with a set of very long nosed pliers) and a new set of pads if they are in the slightest worn, best to do the lot while it is in pieces and possibly new discs. I didn’t as the discs micrometered up ok as far as I could ascertain.

So for a total cost of about £130 I have fixed the 'squeak' and the wandering, I hope and now all is well with the car again.
 
It took me about 1 1/2 hours each side without rushing and Ford quote 3/12 hours labour plus parts at a total cost of £261.70 incl of VAT and that’s without fitting a new hub so the cost of that has to added to the cost so  somewhere in the region of £350.    I did it all as I said for about £130 plus my time and the air only went blue once or was it twice!


Copyright © 2002 www.fordscorpio.co.uk